A newborn website has to go through a lot of meticulous preparation before it goes into production. First of all, you need to carefully determine the pre-construction phase of the website. It is possible that you will need to block potential customers from viewing your site while it’s still under construction.
A suitable WordPress development environment can be helpful in this situation. You can design and develop your new website in a WordPress development environment so that no one can accidentally view it during that time. When everything is ready, you may publish it online.
We will examine the different types of WordPress development environments in this post. And it won’t be fair if we don’t discuss the pros and cons of these environments.
What is a WordPress Development Environment?
In the most basic sense, a WordPress development environment is a private space that allows you to work on creating or modifying a WordPress site. You shouldn’t expose your website to the public while you are still creating it or if the website isn’t finished yet.
The necessary toolbox for development must include a WordPress development environment so they can work on websites and make modifications without being concerned with having errors on live websites.
It is a wonderful idea to test plugin, theme, and WordPress core upgrades before implementing them on the live website. This will keep the main site safe from any damage. But creating a WordPress development environment could appear difficult if you’ve never done it before.
There are 3 components for making the environment to operate WordPress sites, they are –
- A database management system (such as MySQL)
- A web server (such as Nginx, Apache, etc.)
- PHP
The Characteristics of a WordPress Development Environment
From experts’ point of view, you can create an excellent WordPress development environment if you have ensured the following things –
- It is easy to transport
Your WordPress development environment should be portable. You want to share the source code and the content of the website with others via GitHub, while using interactive tools such as Grunt or Gulp. It provides easy support and increases the chances of creating something better.
- It is highly configurable
You may wish to change the current HHVM or PHP version. In order to create a top-notch website, you may need to verify its compatibility with popular plugins and earlier WordPress versions. The flexibility to customize your environment is crucial for this reason.
The combination of configuration ability and portability of the environment will allow you to test your work under various conditions.
- It can be automated
One of the key forces behind developing a WordPress development environment is automation. Use an automation package that belongs in your development environment rather than worrying about stylesheets, scripts, and deployment.
Everything from installing WordPress to packaging products will be done using command-line tools.
WordPress Development Environment: Local vs. Remote
Local and remote, these are the 2 main WordPress development environments you have to create and run your website. No matter which one you choose, you will need all the functional requirements (such as code libraries or databases) for WordPress.
But which one is better? The following comparison table between a local and remote WordPress development environment may have the answer to this question –
| Topic | Local | Remote |
| Definition | An environment where you can develop everything, including themes, plugins, and WordPress core files on a local machine. | A remote environment for developing a WordPress site where all the essential files will be stored and accessed from a remote server. |
| Internet connection | Can operate without an internet connection. | Can’t run without an internet connection. |
| Storage space | It saves everything on a local machine. | It saves everything on a remote server that may need to be purchased. |
| Accessibility | You can access it only on your local machine or computer. | You can access it from a remote location or computer. |
| Team or individual benefit | It is better when you are the only person in charge. | It is better when you are developing a website with a team |
| Security | It is more secure than remote since it doesn’t require any internet connection. | It is less secure since it requires an internet connection and anyone can access it if they have the credentials. |
Setting Up a Remote WordPress Development Environment
Now that we have seen the comparison between a remote and local WordPress development environment, let’s find out how to create a remote environment.
#1 Select a Convenient Application for Remote Development
There are a variety of remote development apps out there. These applications are basically virtual storage locations or cloud-based solutions to give you the accessibility to store all the required documents and programs to run your website.
You can use a program like Visual Studio or DigitalOcean to do this. Alternatively, you may want to consider Amazon EC2. After finding your preferred virtual environment, you must configure it for WordPress development work.
#2 Install the Essential Tools
To make your WordPress site up and running, a remote environment will require a pack of important tools. In remote development environments, this collection of programs is known as the “LAMP stack” and can be integrated in a variety of ways.
#3 Attain the Environment
A Secure Shell (SSH) is the most popular method of accessing a WordPress development environment. The approach of this method for developing WordPress is to give you access to connect the server from any remote location.
Setting Up a Local WordPress Development Environment
According to a survey on Twitter, most developers still prefer to use local WordPress development environments. Perhaps, the following chart will represent the votes in a sophisticated manner –
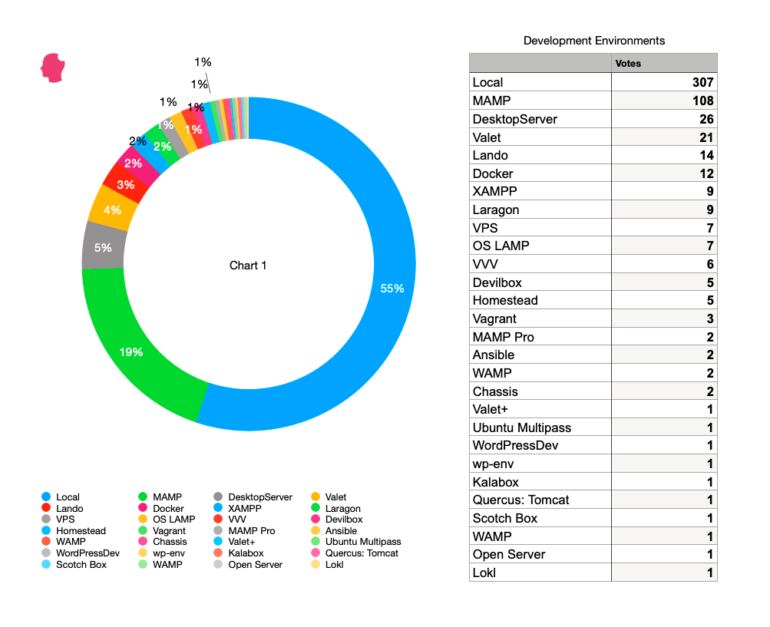
Source: deliciousbrains.com
Without further ado, let’s talk about how to create a local WordPress development environment.
#1 Install WordPress and Setup a Website
Whether you are building a website from scratch or copying it from an existing one, you must install WordPress on your local server or machine. There are several ways to build WordPress sites, regardless of your choice. You can use Composer, WP-CLI, or your own custom scripts to set up WordPress.
The database is perhaps the most crucial component of a WordPress website. Why? Because it may show compatibility issues with many contexts, partly for maintaining URLs and file paths that often oppose keeping relativity.
#2 Set a Local Server
We all know that WordPress operates on a server-side scripting language like PHP. Therefore, a live or local server is required to operate WordPress. To set up a local server, here are the most common choices –
- XAMPP
It is the traditional choice to create and run a local server. Most developers are familiar with XAMPP. However, with the evolution of the web and technology, this option is falling behind. Being popular, it has a support community with tons of members.
- WAMP
This is one intuitive tool for setting up a local server. Like XAMPP, it only works on Windows. It works really fast for creating applications in compliance with PHP, MySQL, or Apache.
- MAMP
Unlike XAMPP or WAMP, this tool for developing a local server can operate on macOS. It is easy to install and use. It has a rich community for getting support. It also has a premium version called MAMP Pro.
- Vagrant
It is a modern tool for setting up local servers. The configuration is very easy, and all it takes is a few command lines to set up a WordPress environment. It also works on any operating system and supports most software.
#3 Transfer the Database
If you are building a website from scratch, you are probably building a new database too. Before making the site online, the live server must contain that database. WordPress databases may be manually moved across environments by exporting them, then importing them using PhpMyAdmin.
You must change the paths and URLs in the .sql export file after the transfer. There are a few methods to do this safely, and they are –
- Through a plugin (such as WP Migrate DB) with search and replace filters.
- Through the WP-CLI search-replace command
#4 Transfer the Media Library
You need to transfer the media library of the website along with the database. Otherwise, all the content and images won’t appear on the local site. There are many options to transfer the media library, among which SFTP is one of the best. This will transfer the wp-content/uploads directory by establishing a connection to the live server.
Another manual approach is using rsync, which will use SSH for syncing files. You can also find various plugins for this work.
#5 Debug Problems
You don’t want to solve problems on the live website and get error_log lines because that will be disorganized and exhausting. Your local WordPress development environment should include debugging tools like WP_DEBUG to solve problems on the local site rather than the live one.
Once you run this plugin with WP_DEBUG_LOG in the wp-config.php file, all the warnings and PHP errors will come up in the wp-content/debug.log file.
| define(‘WP_DEBUG’, true);define(‘WP_DEBUG_LOG’, true);define(‘WP_DEBUG_DISPLAY’, false); |
#6 Get Local SSL Certificate
There are many reasons for getting a local SSL certificate. Depending on the WordPress development environment, obtaining a local SSL certificate may be done in a variety of ways. For instance, Valet lets you enable SSL for your local site by using the CLI command. On the other hand, a host license may be created and used directly in the Interface for MAMP Pro and site.Local.
#7 Get Important Plugins and Tools
There is no limit to setting up the perfect WordPress development environment. Here are some of the important tools and plugins to run your site on a local server smoothly –
- For email services, you have many plugins like Mailtrap or Mailchimp.
- For checking the condition of your database, you can use Query Monitor.
- To analyze the current theme, you can use Theme Check. It will suggest if the current theme is standard or not for your WordPress site.
- You can either use Gulp or Grunt for the ultimate development work and make things automated.
- Although it is not mandatory, you may learn to use a version control tool like Git, GitHub, or Bitbucket.
Final Verdict
Hopefully, this was a thorough explanation of setting up WordPress development environments. By the end of this discussion, you have learned how to set up a local and remote development environment. Please remember, we only showed the process to set up a WordPress dev environment in our way. But there can be thousands of ways to do this, and every developer has a different taste.
Thanks for reading this comprehensive article. We have tried our best to provide the best information. Leave a comment if you have any queries regarding the whole process.